


Once you’ve setup your store and employees you can now configure your products and begin tracking and monitoring all stages.
NOTE: Below are the steps to Add and Edit individual products in the Spoiler Alert App. However, if you need to setup a large amount of products, you may want to upload your products from a spread sheet (.csv file). CLICK HERE or SCROLL to the bottom of this page to view the Bulk Upload Products from Spreadsheet Tutorial Video >
Login to Add/Edit Products
Always begin by choosing to edit your store:
This will be the same process to start every task the owner needs to do, such as Edit/Add Employees and Products, Product Shelf Life, Units of Measure etc.
1. From the main screen tap Edit. You will immediately see the paper and pen icon to the left of the store name. (See number 3 in the next panel).
2. Tap the store you wish to Edit (In this case we will choose Spicy Mike's)

Owner Login:
You will see this screen every time you login as owner. This is where all the functions are to do the back end tasks such as; edit products, edit employees, edit product shelf life, units of measure etc.
1. Enter the Owner Password you chose when you initially set up your store. (Remember this is case sensitive)
2. Tap OK
3. TIP - Whenever you see the paper and pencil Icon next to your store name you know it’s in Edit mode.
Add/Edit Products

Add/Edit a Product
Tap Edit Products
From this screen you can begin to edit all of your store functions, whether it is store settings, products, or employees. In this case we will choose “Edit Products”.

Edit Products - Add New Product:
Tap the (+) in the upper middle. This will take you to the New Product screen
Name Your Product

Enter New Product Name:
Tap "Tap here to enter new product name"
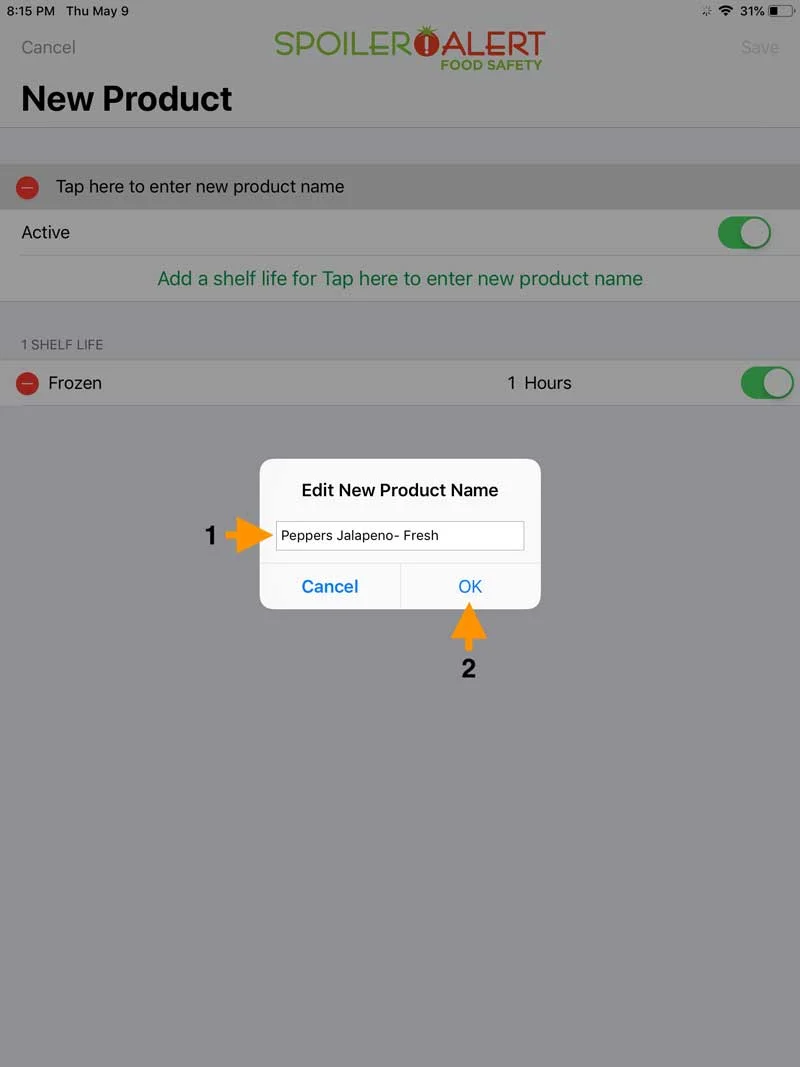
Example Product – Fresh Jalapenos:
In this example we will add our product which is Fresh Jalapenos. In our case we carry a variety of peppers including Fresh Jalapenos. Because of that we shall enter our Jalapenos as Peppers Jalapeno-Fresh
1. Type in the item name: “Peppers Jalapeno - Fresh”
2. Tap OK
*TIP- When adding an item such as “Peppers” be consistent and start with either the generic name like “Peppers” then the type such as "Jalapeño” or vice versa “Jalapeño” Peppers. Also if you carry different versions of the same item add that at the end such as “Fresh” and “Pickled” so if you need to search for your product within the app, all similar items will be grouped together and you can easily choose the item you wish to edit or make a label for.
Below is an example of what you would see if you were searching for “peppers” and you have a variety loaded into the app. Your result will be a nice clean listing of all your peppers and their type.

Add a Shelf Life

Add a shelf life for our new product.
In this screen you will see the default shelf life states. In order to save our new item “Peppers Jalapeno - Fresh” we have to select a shelf life. We will use Dated and save. Once this product is in your system we can add various states of the product life.
1. Select “Dated”
2. Tap Save
The status Dated has no expiration time. When you need to make a Dated label for a product you will select the exact date of expiration. Using the Dated status is a good way for you to label things like canned products that already have an expiration date from the manufacturer. You can create a SAFS label for this so you will get an alert on your devices to let you know it’s about to expire. If you use it before the expiration date you would simply scan the label or mark as sold in the app.
BULK UPLOAD PRODUCTS AND EMPLOYEES FROM SPREADSHEET
*NOTE: This video shows how to edit and bulk import products using a Spreadsheet program (Microsoft Excel, Google Sheets, or Apple Numbers) to import into Spoiler Alert. The same steps are used when bulk importing employees. The IMPORTANT thing you should note is:
IMPORTANT: DO NOT CHANGE TEXT IN 1ST LINE OF THESE TEMPLATES. These are the column headings and they MUST remain as is for your .csv file to import correctly into the Spoiler Alert App.
Headings for PRODUCTS should remain as: Product - Status - Expire - Expire Units
Headings for EMPLOYEES should remain as: Employee ID – Employee First Name – Employee Last Name – Print As – PIN